Lets be honest. Some of us in the construction industry aren't the most computer davy but we can still poke around on the internet. We hear it all the time at the shop when someones placing an order. So we've gone through the trouble of outlining exactly how you can purchase one of our amazing thumbs in seven easy steps.
Steps to Purchasing a Thumb Attachment
1.Measure your machine to see what size Mini excavator thumb you need- Measuring Instructions
Guys email us all the time saying things like hey, i have a kubota kx 41-2v. What size thumb do I need? We can look up the specs and tell you what the machine calls for but odds are it's got a different bucket then when it was shipped from the factory or maybe it has a quick connect. Factors like these will change they required size thumb for your excavator or back hoe. So remember measure twice and cut once, or in this case purchase once haha.
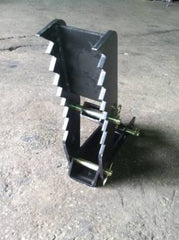
2.Select the type of thumb required for your specific needs (ex. Mechanical Mini or Hydraulic)
To do this you will need to first think about what you'll be using the thumb for. Is this just an occasional need to help you move some logs around the yard? In that case you may want to consider the Mechanical Mini Excavator or Backhoe thumb. Or maybe your using it on a landscape construction project and you need some more muscle moving those odd shape boulders around. I would suggest our fully hydraulic mini excavator or backhoe thumb. In either case it all comes down to what your machine is equipped for. If you don't have a fitting for hydraulic lines on your stick odds are you'll need a mechanical thumb.
3.Select the correct size to purchase (ex. 16" , 18" , 24 " ...)
On our website simply click on the products tab in the menu bar, select the type of thumb your looking for then click on it. That will bring you to a page with product pictures and specs. Right above the buy now button you'll notice a box with a drop down aero, this will allow you to select the correct size and give you the pricing.
4.Add to Cart and enter in Credit Card or Pay Pal information.
We make it easier then ever to pay for your new mini excavator or backhoe thumb. Simply add the item you'd like to purchase to your shopping cart, enter in your credit card information add click the buy now button.
5.$60.00 S+H to anywhere in the Nation
We delivery to anywhere in the United states. It typically take between 5-10 business day depending on the order and location you'd like it shipped to receive your thumb.
6.We will send you an invoice via email and an email once we have shipped your item
We keep you informed every step of the way.
7.Install your new thumb > Installation Instructions
Follow the easy instructions in the link above to install your new thumb
There you go. Seven easy steps to place an order with Miniexcavatothumbs.com
-Mr. Mini Excavator
 You've made the decision to purchase a thumb attachment for your Mini Excavator or your Backhoe.The next question you need to answer is finding the right size and type of thumb. Thumb sizes can range due to factors such as bucket size or if the machine has a quick connect. The best and easiest way to do this is to measure your machine in 2 very simple steps.
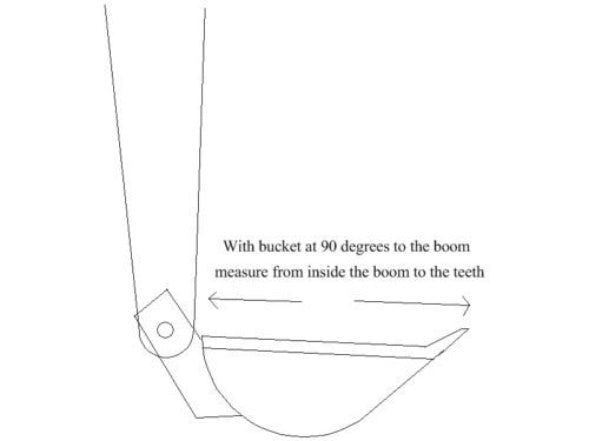
2 steps to measuring your Excavator or Back hoe for a thumb attachment
Step 1 is to position the stick of the machine and the bucket at a 90 degree angle. (see diagram below)
Step 2 is to measure from the stick of the machine to the edge or teeth of the bucket.
It's that simple.Yet the biggest mistake people make when ordering a thumb is that they get the wrong size.
This can be easily avoided by taking 5 minutes to do some quick math. Insuring you get exactly what your looking for in an attachment.
Hope this helps some of you out there.
-Mr. Mini Excavator
You've recently purchased a hydraulic excavator or backhoe thumb and after a few short weeks it has finally arrived. Great.. so now what?
In this article we walk you through a simple installation process for a hydraulic excavator or backhoe thumb.

Step1 Installing the front bracket
- Position the bucket in full curl and locate the bracket as shown in F2. Allow 1/2 inch clearance between the bracket and the bucket. Clamp or tack weld the bracket in place. The tack weld or clamp ned to be sufficient to hold the bracket and thumb.
- Install the thumb to the bracket.
- Check the bracket and thumb position as shown in F1. The thumb to be Position 90 degrees to the flat part of the stick as shown. Bring the bucket and thumb together as shown in figure D2. The thumb must contact the bucket cutting edge or bucket teeth. The bucket must contact the thumb only in this area. When the thumb contacts the bucket in another area the bracket position is to be moved back on the stick to remove the contact area.
Step 2 Installing the Cylinder Base Bracket
- Install the cylinder bracket to the dimension shin and tack weld in place.The tack weld needs to be sufficient to hold the bracket, thumb and cylinder.
- Move the thumb to the minimum and maximum cylinder stroke, check that the cylinder is free and that it has no contact that would damage the cylinder.
- Finish welding the brackets to the boom using 70-18 electrode.
The thumb is now ready for use.
***Warning*** max pressure must not exceed 2,500psi.
-Mr. Mini Excavator
Its been a busy week at BMA Equipment as we prepare to launch MiniExcavatorThumbs.com. It hasn't been easy, especially for a bunch of guys who normally build equipment to create content and build a website but shopify makes it a breeze once you get inside and start playing around.

Special thanks to everyone at shopify for making our first website look amazing and work flawlessly.
Its been really easy to incorporate all of our products and information. This site represents more than just increased sales. Miniexcavatorthumbs.com is proof that our company is growing from a one man shop to a profitable sustainable business.
We will keep you posted on business on the business in the near future.
-Mr. Mini Excavator
 You've made the decision to purchase a thumb attachment for your Mini Excavator or your Backhoe.The next question you need to answer is finding the right size and type of thumb. Thumb sizes can range due to factors such as bucket size or if the machine has a quick connect. The best and easiest way to do this is to measure your machine in 2 very simple steps.

